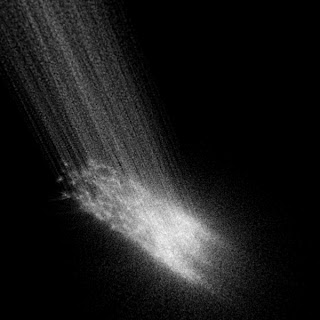
Flowing water effect and material using particle flow in 3ds max p1
Rendering Flowing water effect using particle flow in 3ds max
Type : Particle FX
Level : Beginners/ intermediate

Hello, In this in-depth tutorial, we will be looking at how to create moving water effect using particle flow and rendering with default scanline renderer.
1. Lets Open 3ds max.
2. In the menu bar, select Graph Editor and choose Particle View. Or you can hit 6 key to open particle view window.
3. you will get a window like this called Particle view window. This is a area where we will build our particle flow tree from scratch.
4. In particle view, Go to Display option and uncheck Depot. which will provide us more space to work with.
5. Right Click in the Empty Space of the window and and choose
NEW -> Particle System > Empty Flow
6. "PF Source" node is going to control all the particles that we are going to make. Where we will connect the Birth node which will determine the number of particles and start and end frame of the simulation.
Again click on empty space of the particle view (pView) and
NEW - > Birth Event - > Birth
& Connect the PF Source nodes output to the Events input by simply clicking & draging the mouse from the icons.
7. Now we need a position from where particle will fall down. because if we look at the viewport now, we will see nothing.
So, Now right click in space between Birth Node and Display node and choose
APPEND - > Operator - > Position Icon
APPEND - > Operator - > Speed
13. Select the PF source node and right click -> rename -> type any name .. (optional)
In the property rollout find Quantity Multiplier and make the viewport % to 100 to see actual amount of particles in the viewport.
14. In order to increase the particle count, we will need to append another Test node called "SPAWN" which will multiply our particle count on the go.
Append - > "Test" - > Spawn.
15. Select the spawn node and make changes in the settings.
OffSpring* = 4 ( No. of the new particles for 1 old particle)
Inherited = 68.0
16. In the 3ds max viewport, In command panel, Selet Space warps, and under Forces select Gravity. And draw it on viewport.
In pView window, Append - > Operator -> Force
and in force node select the gravity we have just made.
Cool FX Stuff with 3ds Max :
Type : Particle FX
Level : Beginners/ intermediate

Hello, In this in-depth tutorial, we will be looking at how to create moving water effect using particle flow and rendering with default scanline renderer.
1. Lets Open 3ds max.
3. you will get a window like this called Particle view window. This is a area where we will build our particle flow tree from scratch.
4. In particle view, Go to Display option and uncheck Depot. which will provide us more space to work with.
5. Right Click in the Empty Space of the window and and choose
NEW -> Particle System > Empty Flow
6. "PF Source" node is going to control all the particles that we are going to make. Where we will connect the Birth node which will determine the number of particles and start and end frame of the simulation.
Again click on empty space of the particle view (pView) and
NEW - > Birth Event - > Birth
& Connect the PF Source nodes output to the Events input by simply clicking & draging the mouse from the icons.
7. Now we need a position from where particle will fall down. because if we look at the viewport now, we will see nothing.
So, Now right click in space between Birth Node and Display node and choose
APPEND - > Operator - > Position Icon
8. Now you will see, you have an Icon in the viewport.
9. You can modify this icon with Move,Rotate and scale tool. Place it above the grid facing downward. once you done that, scroll the timeline, you will see particle getting born over the icon.
10. The reason for particles to stuck on the icon is because we do not have any external force acting on it which will make them move. In order to do that, Right click on the event (or on any node of the event) and choose
11. Select the Speed node and set the Speed amt to 100. and after playing the timeline you will have moving particles.
12. Select the Birth Node, and tweak the particle amount and frame range.
Make end frame to 200.
select the Rate and make it 60
In the property rollout find Quantity Multiplier and make the viewport % to 100 to see actual amount of particles in the viewport.
14. In order to increase the particle count, we will need to append another Test node called "SPAWN" which will multiply our particle count on the go.
Append - > "Test" - > Spawn.
15. Select the spawn node and make changes in the settings.
OffSpring* = 4 ( No. of the new particles for 1 old particle)
Inherited = 68.0
16. In the 3ds max viewport, In command panel, Selet Space warps, and under Forces select Gravity. And draw it on viewport.
In pView window, Append - > Operator -> Force
and in force node select the gravity we have just made.


Comments
mobile prices in Pakistan
Free Medical Coding Training and placements in Hyderabad
Glass As a Forging Lubricant
There are numerous things that are utilized in every day life and the vast majority of them are made with metals. For making these items, a procedure known as fashioning is done. Prior, this procedure was proceeded as a work concentrated strategy in which individuals used to set up each piece with their hands.