Form Effect using Modifiers in 3ds max
Tutorial : Create Form and Disappear Effects Using Modifiers in 3ds Max
Type : Effects
Difficulty Level : Beginner

Video Preview
Hello Everyone,
In this tutorial we will be looking at how to create stunning effects using powerful modifiers inside 3ds max.
First we will look forward to Forming effect :
Step 1 :
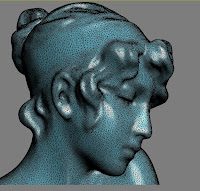
take any geometry and make sure it contains enough segments. For this tutorial I am using a model from 3dmodelfree. Its triangulated and dense enough for creating the effects.

Step 2 :
Here we will discuss about the Volume Select (Vol. Select) Modifier.
Vol. Select modifier is a modifier which can keep a track of selections on continues basis. It can update the selections based on Volume (bounding box) Such as Box, Sphere, cylinder or any kind of custom shape. Also, It can update the selection based on Material ID and Texture Map. Where as the selection type can be Either Vertex,Face or an Object based.

Select the geometry and Apply Vol. Select Modifier from modifier stack.
Step 3 :

Select Selection level to Vertex and Surface as a Texture Map.
step 4 :
Since we chose the Texture Map to determine the selection , We will need to make a Black - White texture map which will update our selection based on color value.
i.e White = Selection and Black = Non selection
Hit''M' on Keyboard to open material editor.
Click on Grey Box of the Diffuse channel, and choose a Noise Texture.

Step 5
Choose Noise type as Fractal for now and keep the Low value to 0.1 and High value to between 0.1 to 0.3

Step 6 :
Turn on the Auto Key and Animate the High Value from 0.1 to 1 within 100 frames.


Step 7 :
Now Drag the Noise map from the material slot to Vol.Selects Texture Map slot.

Step 8 :
Now Scrub the time Line and you will see the frame by frame updated vertex selections.

Step 9 :
keep the selection active and Go to Modifier List and choose "Delete Mesh" modifier.
It will look only for selected vertex and apply delete modifier to it.

Step 10 :
Because of delete mesh modifier we will get cool effect of forming Geometry over the time range of 100 Frames.


Similarly you can use Gradient Ramp,Checker Map,Cellular map.. etc to create this effect.
Step 11
Finally
To make it reverse, That is to Disappear the geometry over time, Just Flip the High Value from 1 to 0.1. (while changing the values, keep the Auto Key ON)

Thats it folks..
In next tutorial, I will come up with more effects based on modifiers as shown in the video . :)
For feedback kindly comment below or mail me at nicks1008@gmail.com
- Nikhil D
nikart3d.in
Type : Effects
Difficulty Level : Beginner

Video Preview
Hello Everyone,
In this tutorial we will be looking at how to create stunning effects using powerful modifiers inside 3ds max.
First we will look forward to Forming effect :
Step 1 :
take any geometry and make sure it contains enough segments. For this tutorial I am using a model from 3dmodelfree. Its triangulated and dense enough for creating the effects.


Step 2 :
Here we will discuss about the Volume Select (Vol. Select) Modifier.
Vol. Select modifier is a modifier which can keep a track of selections on continues basis. It can update the selections based on Volume (bounding box) Such as Box, Sphere, cylinder or any kind of custom shape. Also, It can update the selection based on Material ID and Texture Map. Where as the selection type can be Either Vertex,Face or an Object based.

Select the geometry and Apply Vol. Select Modifier from modifier stack.
Step 3 :

step 4 :
Since we chose the Texture Map to determine the selection , We will need to make a Black - White texture map which will update our selection based on color value.
i.e White = Selection and Black = Non selection
Hit''M' on Keyboard to open material editor.
Click on Grey Box of the Diffuse channel, and choose a Noise Texture.

Choose Noise type as Fractal for now and keep the Low value to 0.1 and High value to between 0.1 to 0.3

Turn on the Auto Key and Animate the High Value from 0.1 to 1 within 100 frames.


Now Drag the Noise map from the material slot to Vol.Selects Texture Map slot.

Step 8 :
Now Scrub the time Line and you will see the frame by frame updated vertex selections.

Step 9 :
keep the selection active and Go to Modifier List and choose "Delete Mesh" modifier.
It will look only for selected vertex and apply delete modifier to it.

Step 10 :
Because of delete mesh modifier we will get cool effect of forming Geometry over the time range of 100 Frames.

Play with Scale and Noise type to get more patterns and variations


Similarly you can use Gradient Ramp,Checker Map,Cellular map.. etc to create this effect.
Step 11
Finally
To make it reverse, That is to Disappear the geometry over time, Just Flip the High Value from 1 to 0.1. (while changing the values, keep the Auto Key ON)

Thats it folks..
In next tutorial, I will come up with more effects based on modifiers as shown in the video . :)
For feedback kindly comment below or mail me at nicks1008@gmail.com
- Nikhil D
nikart3d.in


Comments
just found a good modeling tutorial
Medical Coding jobs for Freshers